
Hello!
Today I would like to share two projects: the first is a stamped candle in a flip-lid lattice box and the second is a cute box with dividers to hold Christmas card candy.
Stamped Candle and Lattice Flip-Lid Box
 This project was centered on creating something beautiful out of something small and simple. The candle (the main gift) is stamped and embellished with rhinestones to pretty it up, packaged in a box with a lid that flips open the reveal the candle on the inside. The candle is stamped with the Merry Little Christmas stamp from the set of the same name. This is such a gorgeous stamp set and a wonderful greeting stamp for Christmas. The flip-lip box incorporates the lattice die on the box’s top, back, front and sides, also embellished with basic rhinestones…doesn’t it look beautiful! Despite its simplicity, this gift sure has WOW-factor!
EDIT: To create the box I have used a Silhouette file (3D cupcake box with chain windows by Samantha Walker). I deleted the perforation lines (so that I could score and fold these lines myself, resulting in crisp corners and edges) and replaced the chain windows with squares so I could use the lattice die in the windows instead. I am currently working on a tutorial based on this type of box for those who do not have e-cutters. Stay tuned for the tutorial 🙂
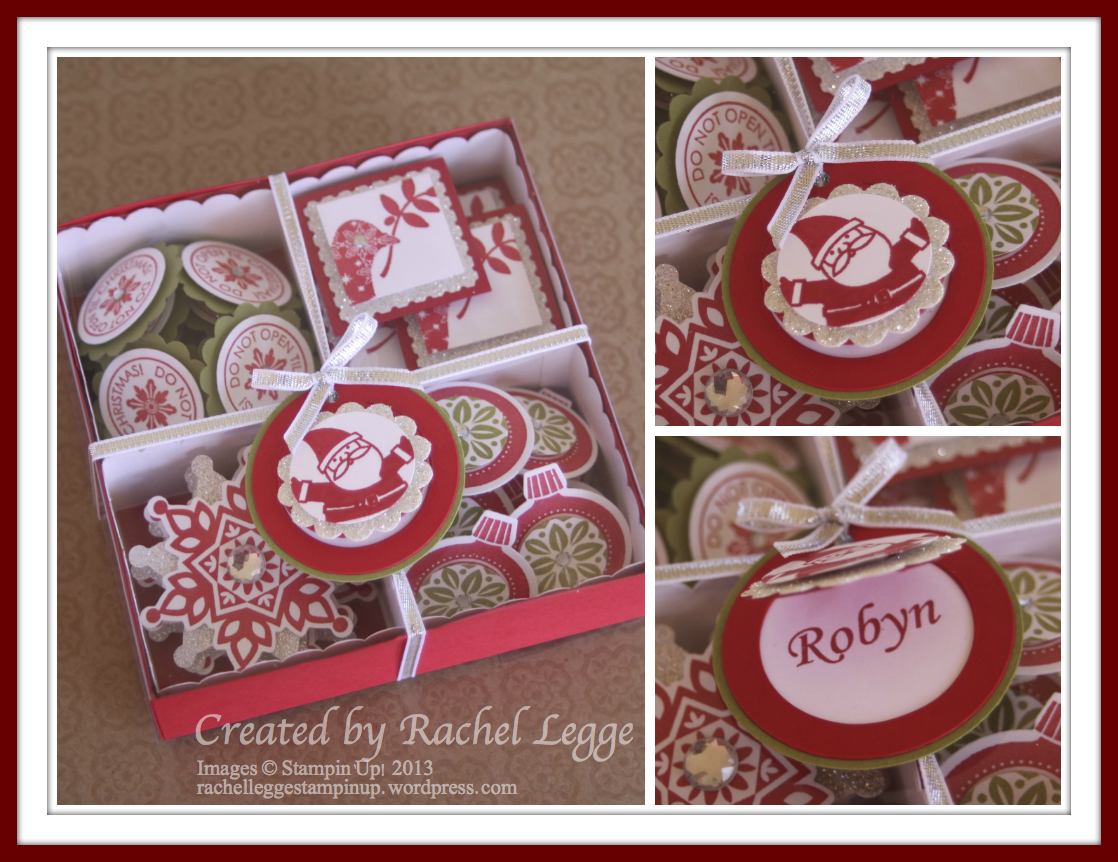
Christmas Card Candy and Divided Box

Card Candy (not to be confused with Candy Card, lol) are ready-made embellishments for cards, usually using the one stamp set and colour scheme, presented on a piece of cardstock in a bag with a topper. For my card candy, I have differentiated from the “definition” of card candy somewhat by using several stamp sets to create my card candy, and a box (rather than a bag) to contain them. The box is 1-1/4″ tall, designed to hold a large quantity of card candy, with four individual scallop-edge boxes to separate the different designs. To keep the card candy from falling out, there is a Window Sheet sleeve which wraps around the box and slides on/off.
For my Christmas card candy, I chose to follow a traditional colour scheme of Real Red and Old Olive (and silver glitter) but I am sure that these would look beautiful in other colours also. Because of the varied sizes of the different designs of card candy, there are different quantities of each particular design (listed below):
- Do Not Open – 10
- Dove – 6
- Ornament – 10
- Snowflake – 4
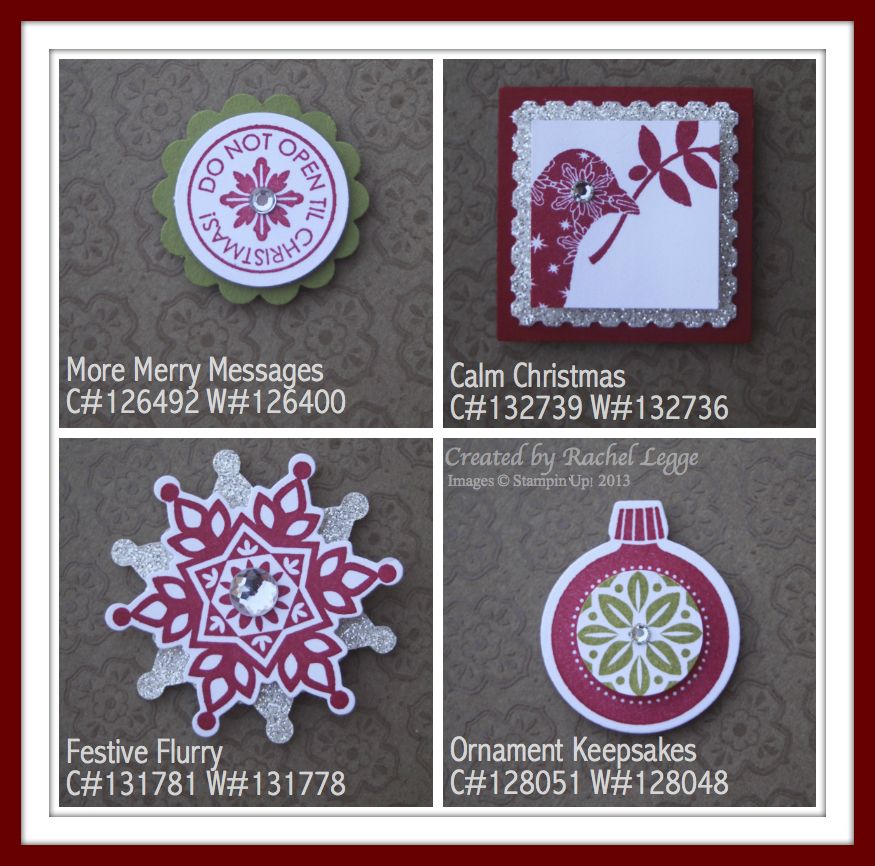
This picture shows the different individual card candy designs, with the name and code of the stamp set used listed below the image.
Finally, to finish off the card candy box, the silver 1/8″ ribbon from the Holiday Catalogue was tied around the box like a present, and a tag, created using the peekabooo frames die, was added. The Santa image on the tag is from the Christmas stamp in the Tag It stamp set, which lifts up to reveal the recipient’s name below.
Katie and I loved creating these stamped candles and card candy – they make beautiful handmade gifts that I’m sure many would appreciate and enjoy.
Thank you so much for reading my blog, please check back again soon for more posts! To order any of the products I have used, click the SHOP link at the top of this page to order the products online and have your order delivered straight to your door.
Rachel (and Katie) xx
—-
Stamp sets used:
- Ornament Keepsakes W#12048 C#128051
- Calm Christmas W#132736 C#132739
- Festive Flurry W#131778 C#131781
- More Merry Messages W#126400 #C126492
- Tag It W#130300 C#130303
- Merry Little Christmas W#131826 C#131829
Other products used:
- Ornament Keepsakes Framelits #127816
- Festive Flurry Framelits #132193
- Postage Stamp Punch #122344
- 1” (2.5 cm) Square Punch #124049
- 1” (2.5 cm) Circle Punch #119868
- 3/4″ (1.9 cm) Circle Punch #119873
- 7/8″ (2.2 cm) Scallop Circle Punch #129404
- Peekaboo Frames Bigz L Die #124587
- Old Olive Cardstock #106576
- Real Red Cardstock #106578
- Whisper White Cardstock #106549
- Silver Glimmer Paper #124005
- Window Sheet #114323
- Silver 1/8″ (3.2 mm) Ribbon #132137
- Large Rhinestone Basic Jewels #129324
- Rhinestone Basic Jewels #119246
- Real Red Classic Stampin’ Pad #126949
- Old Olive Classic Stampin’ Pad #126953
- Old Olive Marker #100079
- Stampin’ Dimensionals #104430


I just found your lattice box on pinterest! It is really stunning! I would love to have the directions to make it. Can you point me in the right directions please? Thanks,
mflayer at comcast dot net
Hi NJ Stamping Queen, I have edited this blog post to include how I have created the lattice box, using a Silhouette file and the lattice die. I plan on creating a similar box, without an e-cutter, and will post a tutorial for that here when I have completed it (but that may take me a while) 🙂 Thank you for your comment, I am surprised and happy so many people love the lattice box. HTH, Katie and Rachel x
Do you have instructions for the lattice flip lid box?
Hi Marsha, I have edited the blog post to include how I created the box (using a Silhouette file and the lattice die). I plan on creating a tutorial to make a similar box without an e-cutter and will post a link to that tutorial in this blog post when I have completed it (which may take me a little while) 🙂
Hi there……
Just found your GORJUS wee candle box thru Pinterest…..it is delish. I give quite a few candles for Christmas and birthdays.
Is there a tutorial somewhere??? Did you use the Square Lattice die??? I am so v v sorry for the Q’s but the box is magnificent.
Thanks – Lynda (SU demo fm Sydney)
Hi Lynda, I have edited the blog post and added how I created the box (using a Silhouette file and the lattice die). I am planning on creating a tutorial for a similar type of box for those who do not have an e-cutter. I will link to the tutorial in this blog post when I have completed and posted it (it may take me a little while) 🙂 Thank you for your kind and encouraging comment – it is always nice to know people like your creations. Katie & Rachel x